Changing Water Spray Heads, With New Solution, Solved Problems.
Beside my car parked in front of our house are three rose bush planters about 6 feet square. Problem for us was that the spray heads were spraying water well beyond the planter walls. My car parked next to the planters was getting wet with a lot of water.
I went to Home Depot and found what I hopped was the answer. I was looking for a 45 degree spray head. I just loved the top screw adjustment that acts as a water valve.

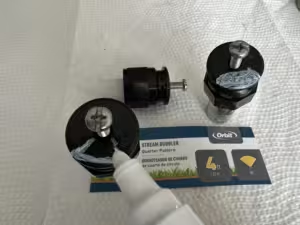
Looking at the spray head, I was concerned that it would be really difficult to understand which direction the spray was aimed. I just had to pain the spray head top so that I would easily be able to rotate that spray head so it would best cover the planter box. I was darn lucky to find that we already had a near perfect white paint marker. I looked at the marker label and it seemed that it would work.

The above image shows the paint marker I used. (Sharpie Oil-Based Paint Marker, Medium Point, White Ink.). The only reason I used this marker is that I already had it. Do the research and see if there is a better marker. The reason is that a maker that stands up to the abuse of being outside, exposed to the weather should be considered.

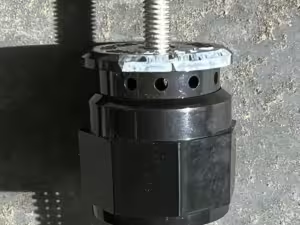
The spray head, in the above image, is showing white paint applied, to show where the water holes are located. Bottom of the image is where you would screw the spray head into a supply source pipe. The middle of the image shows some of the holes where the water will shoot out. The top of the image shows part of the (top) adjustment screws used to adjust how much water exits the head. I just love the large phillips-head screw head provided as it is very easy to stand next to an installed head with a long phillips-head screw driver and make adjustment.

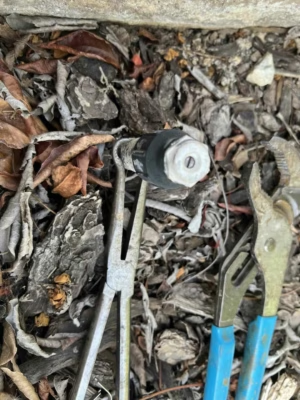
The image above shows an existing, rather old, spray head that I needed to remove. The reason for the two different wrenches is that one wrench is used to make sure that the supply water line pipe coming out of the ground does NOT rotate. The reason for this is you definitely do NOT want to remove that pipe and thus allow any particle of debris to fall into the open water line as it will help clog the head filter.
The second wrench is for rotating the existing sprinkler head. From my experience, I found that I could rotate the sprinkler head by hand almost every time. The scond wrench was only used when necessary.

The above image shows a new finished painted sprinkler head that has been installed. I am so darn happy that I took the time to paint the new sprinkler heads so they show the direction and angle that the water will shoot out.
The time it took me to paint 6 sprinkler heads was about 10 minutes, once all the items were provided in front of me. Believe me; if I had not painted the spray heads the installation of those heads would have taken me a LOT LONGER! ALSO, to the degree that the paint lasts, can be seen, can really offer you confirmation that the spray heads are properly aimed by just looking down at them.
Posted 11-12-2024
By: Score Card